Showing posts with label Project Online. Show all posts

Thursday, May 28, 2020

Microsoft Project bricks: Project Online, Project for the web, Home, Roadmap, Project Operations

A new brand area is coming in the Project world. I do believe that the project management paradigm is changing. 10 years back, project managers used to be professional schedulers with certifications, excellent project management skills and a dedicated continuous training and education.
Nowadays project managers are more and more employees who have project management appetence and are coming to this position by seniority after a few years holding other responsibilities. They could be web designers, developers, architects... 
When the traditional Project world (Project Server and Project Online with MS Project Pro) was perfect for the first category with strong scheduling and project/portfolio capabilities, the second category could not fit in it: tooo complex, too many features, too many constraints, training required, etc... 
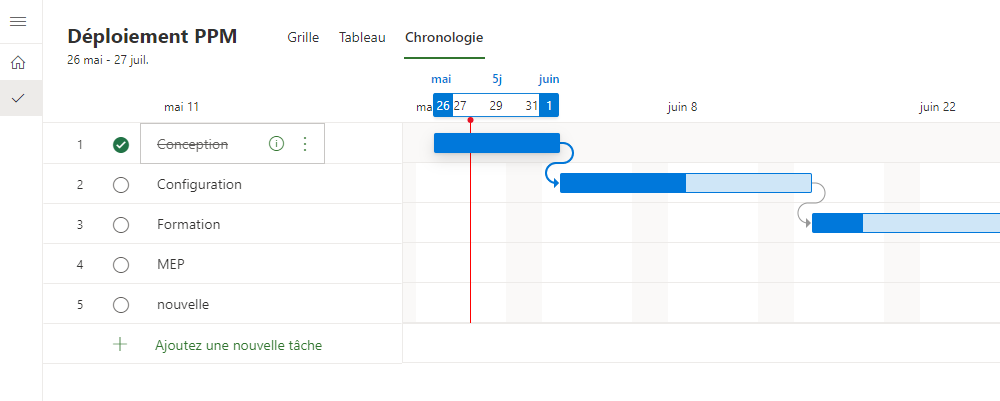
Project for the Web with Roadmap coming with the CDS and Power Automate bring all together a brand new project management approach: simple, intuitive, full web, no training, drag and drop. No more critical path, just a few columns, you can start just right now to plan your project and activities, using a simple task grid, Kanban or Gantt. You can of course add some information such as effort, % complete, predecessors to make your project plan relevant and gather data at portfolio level using PowerBI. 
My guess is that Microsoft with invest more and more on this approach. Moreover, Project Operations, coming this fall will extend Project for the web using CDS to make it work with PSA service. You can still use Project Online, there are so many organizations using it that it will still remain for at least a decade. And Roadmap helps you consolidating both Project for the Web and Project Online data.
I won't give more technical details about Project for the web since you can already find a lot of amazing things on the web, especially about implementing business rules using Power Automate. 

References:

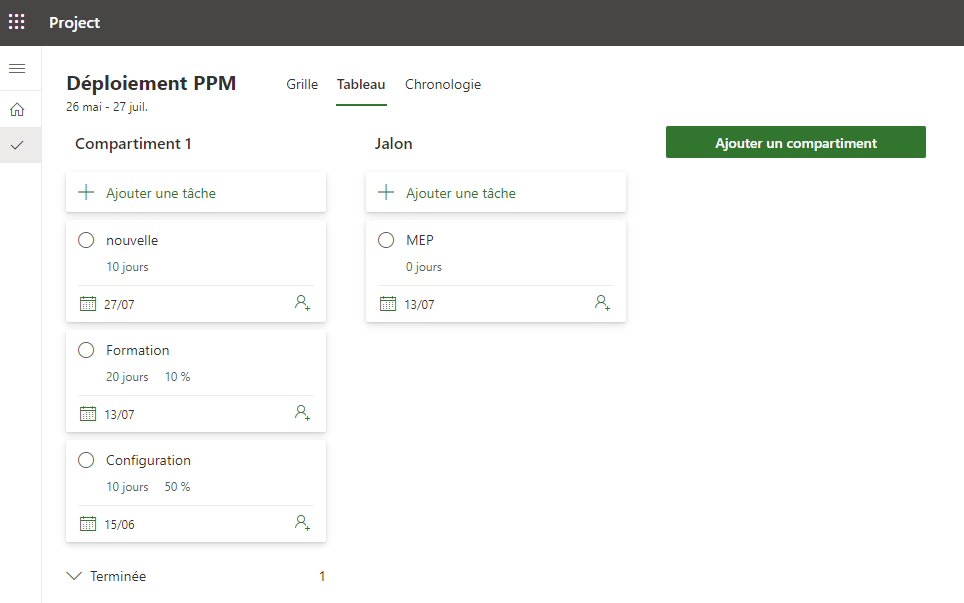
Below a few screen shots:


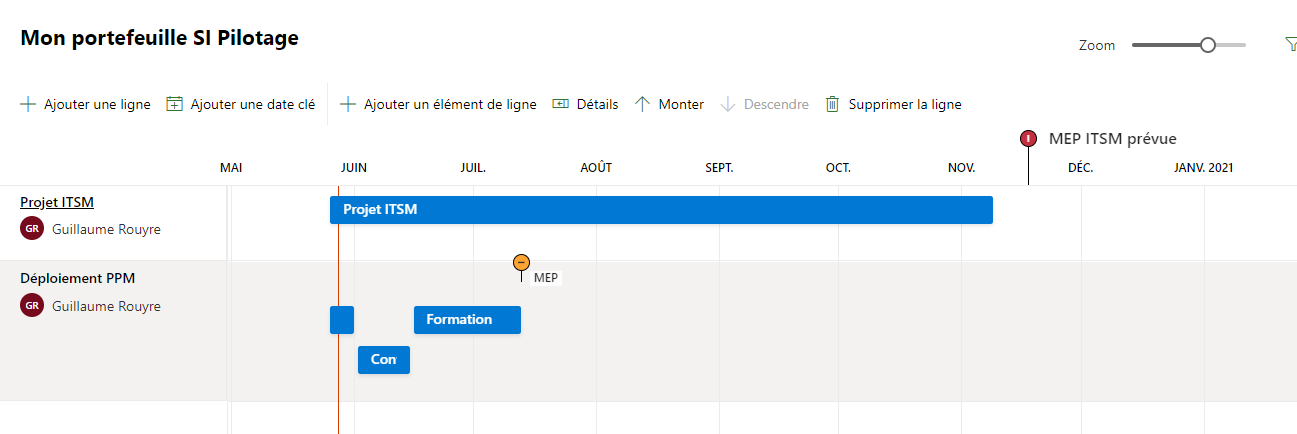
In Roadmap you can have a portfolio view adding your Project for the web projects (Déploiement PPM), your Project Online projects (Projet ITSM). You can also add Azure DevOps projects.
Finally in Project Home you can see your roadmaps (portfolio views) and your projects.

Share this article :

Monday, July 1, 2019

Renewed as MVP, 6th time in a row!


Honored to be renewed for the 6th time in a row as a Microsoft MVP in « Office Apps & Services » with a focus on Project and Portfolio Management (PPM).

Since 2014 it is always the same excitement to be part of such an amazing community.

Follow me on my blog to learn about Project Online/Server, PowerBI, Planner, Flow, SharePoint, etc…

Share this article :

Tuesday, March 19, 2019

Delegation in Project Online: what's wrong??

4 years ago, I wrote an article about the delegation limitations and it has reached a great number of views. I guess this is because the delegation feature is (I should say was) intensively used by administrator for daily support and security model use case testing.

However back to May 2016, we noticed a strange behavior while running delegation sessions. Starting a delegation session for a user with limited access (team member for example), we were seeing more projects than we were supposed to. As usual, Brian Smith reacted promptly and published an article to explain this unexpected behavior. I didn't update my initial article at this time, and I now feel like I should write a short post about it since I still see this question on the TechNet forums and from some on my customers, so I think that this change in the delegation feature is still not completely known and well understood.

Basically you'll see this unexpected behavior if the delegate user is a global administrator (O365 admin or Site Collection admin). Here the reason of the change, with Brian's words: "The reason for the change is that in Project Online customers were accidentally locking themselves out of PWA by removing all their PWA administrators – and then the only way to make a user an admin again was to open a support call". To avoid this frustrating situation where the admin is locked into a delegation session, this restriction was created.

The workaround is unfortunately not magic: you simply have to use a session (not delegated) of a user to test the security model. 

Share this article :

Wednesday, February 7, 2018

[Project Online & Flow] How to send an email when a project is created?

Obviously, I get excited when I see that I can answer a business need which I couldn't answer before, due to my tragic lack of development skills... So this post is another one in the series of "nice features you can easily and quickly implement without a single line of code". 

I am currently working with a customer who manages opportunities in Project Online. Sales persons create opportunities as projects in Project Online in order to prioritize them and see how they fit in the portfolio, in terms of cost and capacity. So far so good... The thing is opportunities must be qualified by the engineering department once created by the sales. Engineering department would like to know when an opportunity is created. So our objectives is quite clear: how to send an email as soon as a project is created? More than that: how to automate this process. We are here in the RPA field (Robot Process Automation). 2 years ago, it would have required custom developments, probably using Sharepoint Designer, Nintex, Visual Studio. So spending time and money to write specifications, code, test, integrate, deploy, manage evolutions... Now, I tell you, Office 365 can give you the ability to set up this business process in 5 minutes using MICROSOFT FLOW. Let's see how!

Basically Flow allows you creating connectors between applications, Microsoft apps but also an entire set of third-party apps. You need to fill in a Sharepoint list when you receive a Tweet? Use Flow! You need to store attachments in OneDrive when you receive an email from a specific person? Use Flow! I think you get it... 

First ensure that Flow has been activated as a service in your O365 domain. Then access Flow home page. You'll a huge number to predefined connectors. The community is incredibly active of Flow and you'll get more and more connectors over the years.
Available Flow connectors

I apologize in advance, my tenant is in French so all captures are in French. But I guess everyone will get the big picture. Once logged, you can pick up an existing connector, which works more or less like a template. I decided for my example to start from scratch, creating a brand-new connector.
New connector creation
Select the first action (trigger). If you just type PROJECT in the search bar, Flow will propose you a set of possible triggers using Project Online. I'll pick up the trigger "when a project is created".
Connector trigger

Then you'll be asked to enter you PWA tenant URL.

Enter your tenant URL

You have now to search for the appropriate application for the action. I'll pick up "O365 Outlook - Send an email".
Choose the application for the action

You can see that it is quite straight forward once you have selected the app. You just select who should receive the email, the object, the body, using Project Online dynamic content. In my case, I send the email to a specific person, but it could be to the creator for example.

Action settings
Save it and that's it! Create a new project and you'll receive the email.
Email recieved after project creation

Then you can navigate in the Flow interface to see what options you get, such as saving the connector as a template, exporting it, etc...
Connector options
Note that you can also do some analytics on your connector: when has it been triggered, how many times, success, failure, etc...
Connector analytics

I also tried to add a condition, because you might want to filter on a specific project type, owner, ID, dates, etc...
Connector with a condition

I just presented this morning a webinar on Project Online and how it interacts with the O365 bricks, and this is the perfect illustration. The paradigm has changed. For business processes such as my simple example, the O365 suite offers to the organizations an incredible time-to-market and sustainability.


Share this article :

Monday, January 29, 2018

How to display phases and milestones in the Project Center?

The Project Center is still after many years a central point when working with Project Server and Project Online. With the introduction of Business Intelligence tools such as PowerBI, SSRS, Excel Service, our customers have become more and more demanding in visualization capabilities. Especially in the Project Center which proposes a synthetic view of your projects portfolios, directly connected to the project details. For example, we always try to push our customer to stick to the project management best practices, meaning following a set of predefined phases. 
Project Center view
That being said, the project center core almost hasn't changed since Project Server 2002, which limited capabilities of customizations. I'll show you that you can anyway use those limited capabilities to display in the Gantt chart project phases and milestones.

Before starting, I would like to give credits to Erik Van Hurck who wrote an excellent post about this same subject. I'll start from that, give some ideas to go further and include the milestones in the approach.

1-Configure a custom Gantt chart
Oddly, you'll not use enterprise custom fields which are quite the first step of a Project Online configuration. The corner stone of this approach is to use CUSTOM dates. In the PWA Server Settings, go to the "Gantt chart formats" and choose a custom format such as Gantt1 to customize it, eventually rename it. You can specify a visualization for each phase using custom start and finish dates. In my example I have 9 phases (I know, it is too many...) and a key milestone. Note the configuration for the milestone where you configure the beginning and finish of the shape, but not the shape itself. 
Custom Gantt chart customization

I usually also remove the project summary task so you won't have a summary task bar above the phases.


2-Configure the custom Project Center view

You can now create a new view from scratch or by copying an existing one. You'll have to use your Gantt1 custom format.
Custom view configuration using the custom Gantt


3-Configure the custom start and finish dates
The tricky part is that even if you use custom durations in the custom Gantt format, you must not use the custom durations in the projects. The Gantt format custom durations in PWA are actually not linked to the project custom durations, but are the difference between custom finish and custom start dates. Thus in MS Project, just configure your custom start and finishd dates. You need to set up a trigger to copy dates into custom dates. My advice is to use a task custom field with a drop-down list to copy start/finish dates into the custom n start/finish dates. Doing this, you get rid of typos. 

Local custom field configuration
Note that (thanks Erik for the tip) in the formula for the start dates, you have to set a far far away start date if the condition is not fulfilled, with a rollup at minimum. On the contrary for the finish dates, set an oldest date in case the condition is not fulfilled, with a rollup at maximum. Doing this, you're sure that you'll get the earliest start date and the latest finish date.

Note also that since there are local custom fields, you have 2 solutions to make those fields available for users (even if they don't have to update those calcualted field) :
- Add them to the Enterprise Global using the organizer.
- Add them to your WBS associated with your EPT (my choice).

To go further, you should define a WBS with your phases and this "phase" custom field already pre-configured. 

Once done, this is all automatic for the users, as soon as they publish their projects once you did the configuration. They just need to be careful to correctly enter the phase custom field (task level) in the project. The dates should be copied in the custom dates, then the Gantt chart will use them in the Project Center. Note my key milestone shown as a red star.
Custom Project Center view with phases and key milestones

Limitations
You have only 10 custom durations, meaning that you can configure up to 10 phases/milestones. I've tried to simply use a start or finish date for the milestones, so I can configure 2 milestones on a single custom duration, but so far no luck. I think this is because it needs a start and a finish date to calculate the custom duration, even if it is a milestone.
The other limitation is not really a limitation, at least in my use case. Since you're using local custom fields, they are not in the reporting tables so you cannot use them in your PowerBI reports. But as I advice to use a "phase" task custom field in your WBS, this would be the one used in your reporting.

Share this article :

Monday, January 8, 2018

LAUNCHED - OData Improvements to Include Timestamps for Project Entities


Last year, I was excited about a roadmap feature that had been updated on the Office 365 Roadmap. I talked about it here.

Well, here is an even more exciting update as it has been released the 4th of January. I haven't seen any official blogs yet so I had a bit of an investigation to understand what changed.
Overall, Microsoft has kindly provided the modified information to the following tables;


DataSet
Added Field
Comment
Assignment Baseline Timephased
AssignmentBaselineModifiedDate
Date of the modified baseline (date it has been published)
Assignment Timephased
AssignmentModifiedDate
Date the Assignment has been last modified
Engagement Timephased
EngagementModifiedDate
Date the Engagement has been last modified
Engagements
EngagementModifiedDate
Date the Engagement has been last modified
Project Baselines
ProjectBaselineModifiedDate
Publish date of the last modified baselines
Resource Demand Timephased
ResourceDemandModifiedDate
Date of the Resource Demande last modified
Resource Timephased
ResourceModifiedDate
Date of the Resource last modified
Task Baselines
TaskBaselineModifiedDate
Date of the modified baseline (date it has been published)
Task Baselines Timephased
TaskBaselineModifiedDate
Date of the modified baseline (date it has been published)
Task Timephased
TaskModifiedDate
Date of the task last modified
TimesheetLine Actual
TimesheetLineModifiedDate
Date of the timesheet line last modified

That is really great addition. For example, as Guillaume was stating in his comment from the previous blog, we can now track changes in the baselines and validate when a baseline has been defined.
Therefore, we can easily add a bit of smart in the queries to download only if a data has been modified.
Here is a quick example of a Power Bi report using the Baseline Modification Data to highlight tasks baselined after the project has been baselined.

One thing I am not so happy about is that I was expecting to have a trending capability with some historical data stored somewhere. I guess I was too demanding. The new fields are providing with a last modified date at a lower level than the Project level but are not recording the historical values of the fields before they changed. Something that Microsoft is hopefully considering soon. you can vote here: https://microsoftproject.uservoice.com/forums/218133-microsoft-project/suggestions/15300603-implement-versioning-in-project-online.

Tell me what you think about that added information and what usage you may do of it!

Share this article :

Wednesday, December 20, 2017

OData Improvements to Include Timestamps for Project Entities


A quick article to share an exciting news for the Project Online community. 
While having a look at the roadmap for Project Online, I discovered a very interesting feature that a lot of people will be happy to see released and wanted to share with you.
Indeed, it looks like Microsoft is working on a capability to do trending on several elements of Project Online including Project, Engagement and resources data. 
I would be really interested to know what the etc. will be but it is a really good start.

Let's keep us posted!
Share this article :

Friday, December 15, 2017

PowerBI report pack V2 for Project Online: add the weekly timescale

I'm not a developer guy, thus I'm quite happy with PowerBI. I can do nice reports and have the feeling that I actually developed something. Microsoft provided a report pack updated (v2) which has been blog quite all over the web. But what I found (and my customers too) is that the monthly timescale for the capacity planning was too high level and they need to bring a more granular look to the resource capacity planning.

Of course, we all know that since a couple of weeks, you can choose the reporting granularity. But if like me you are not willing to update and migrate all your reports impacted by this change, you might just want to keep your original reports and add to them the weekly dimension.

So here is what they would like to have. Note the weekly timescale.

Nice isn't it? So how to get there starting from the report pack:

In the query editor, edit the TIMESET table, then the "removed other columns" step to add the week number.


Since this is a one-digit column, for the ordering to be done correctly (1, 2, 3...) and not (1, 10, 2, 3...), you need to force the week number to be 2 digits. Create a custom column with the following formula: 
Week = Text.PadStart(Text.From([TimeWeekOfTheYear]),2,"0")

Insert a new field extracting the 10 first characters of the date, then the 4 last characters to extract the year:

Finally concatenate the year and the week number doing a merged new column:

Apply the changes, and now you are good to use this new weekly time dimension in any of the visuals.


Share this article :

Wednesday, December 13, 2017

How to archive completed projects?

This is quite a common request from organizations. How to archive completed projects? Especially from organizations having a large amount of mid-sized projects. After a couple of years using Project, you can have up to 300 projects visible in the project center and in MS Project. Moreover you don't have anymore (that's a shame, I know...) the back-up and restore feature in Project Online, which allowed you in Project Server keeping one or many versions of a project. So you could delete the draft/publish versions, still having access to the archived versions from the archived DB.

That is to said : there is a way to archive properly completed projects. The easy but not ideal way is to simply filter out completed projects from the Project Center views, adding filters to the view definition. The issue of this way of doing if that the projects are still visible in MS Project/File/Open.

The best practice is to create a security category associated to a security group. Basically, you put all completed projects in the category where you deny all permissions. And you associate this category to a group where you add all non-admin users. So far so good. This process has been shared since almost 10 years across the Project community, so much that it has also been officially blogged by Microsoft here for Project Server 2010.

So why would I rewrite it? Because the procedure doesn't work anymore as-is. Don't know exactly when this happened, but Microsoft might have updated a setting in the back-office security model. Here is the trick: in the category settings, you need to check all views. I'll just detail these steps but keep in mind that all the steps from MS article (unpublish, project site) are still applicable.

SECURITY GROUP
You first create a security group for non-admin users. Put in it all users who should NOT see the archived projects. Of course, don't add yourself or any admin. 
That's it for the group.

SECURITY CATEGORY
Create a category, adding all completed projects. Do not check any of the options under the available/selected projects.

Add all the views to the category, that's the new thing:

Then add the archive group to the category. Click on the group once added and deny all permissions of the group. 

Et voilà!

Note that this is the only occasion where I use the DENY permission which is very strong. For example, if a user is a member of groups A and B associated with categories A and B, if a permission is granted on category A but not granted (meaning neither allowed or denied), the user will have the permission. While if the permission is granted on category A but denied on category B, the user will NOT have the permission. This is why by default, we never recommand to use the deny option, but rather not check any of the options.


Share this article :

Thursday, November 23, 2017

OneNote and Project Online - Add Efficiency to your Meeting Minutes and Improve Collaboration


Hi All, 

Recently, I had to help a client use the Notebook which is part of the Project Site by default on any Project Online tenant having at least an Office 365 license. you will know if you have access to that if you see this link in your Project Site:

I would like to share with you a nice way to use the notebook embedded in the Project Site to improve the collaboration and information sharing within your project team.
first things first, when clicking on the Notebook link, OneNote Online will open and you will be able to edit the workbook online. as soon as you do this, everyone who have access to the site can see and collaborate in the notebook

Whilst this is already a great feature, let me tell you how powerful is the integration with the overall office suite. Here is the scenario. As a project manager, you setup a meeting that you would like the minutes to be shared across your team.

the first thing you will have to do is to open your notebook using OneNote 2016. while clicking on the Open in OneNote link, on the above screen, OneNote will automatically open and create a link for you to the notebook in the project site. just click on the below and that will be done automatically.

The notebook then opens in OneNote.

Now jumping in outlook, you can now create a meeting invite and include a link to the notebook clicking on the following link

You will have to select the synchronized notebook


That will include this link in the invite that will allow the users (who have access to the Project Site) to access to the notebook from either their OneNote 2016 or from OneNote online.

From that, the magic happens. a new page is created including your meeting attendees and notes that were in the invite. you can now use either the online or the local version of OneNote to provide update and insert minutes or other information. see below the (almost) simultaneous edition of the notebooks from OneNote 2016 (left) to OneNote Online (right)


Obviously, you can also access and edit the information from your phone

I love this functionality. Do you?

Admin Challenge

I encountered a challenge when setting up a new project site template on the notebook name. Indeed, the notebook name on project site created using the new template will use the template's notebook name (Project Site Template in my case which was the name of the site).
Two solutions from ther
1. Renaming the notebook after it is created. thanks tom for these instructions
2. Rename the Project Site Template notebook with a generic name like NoteBook that will be used in all newly created sites


Share this article :

Monday, November 20, 2017

Configure rollup of timephased reporting data in Project Online

Recently the product group has made some improvements to optimize Project Online performances. I particularly think about the project center updates and the EPT configuration to store the project sites out of the PWA site collection.

The last feature, currently being rolled up, is the ability to configure the rollup level of timephased reporting data, used through ODATA, with PowerBI or Excel.
Here is the Microsoft article:

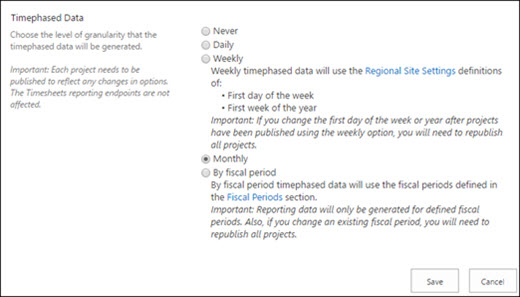
Basically, you'll find a new entry in your PWA server settings, enterprise data section. You'll be able to choose if you want to rollup timephased data at daily (current), weekly, monthly or at fiscal period level.


A few aspects to have in mind:
Any changes require to republish the projects.
  • For new instance (created after the rollup), NEVER will be checked, meaning that this is one of the first parameter to configure for a new instance using odata reporting. You can keep is like this is you don't need timephased reporting data, it will improve your queue performance.
  • For existing instances, DAILY will be selected, which means that it will have to impact on existing reports.


We strongly advice to first change the parameter on a test environment to check that the reports still work. For example, Ion the dashboard I usually deploy, the capacity reports use a weekly or monthly timescale, so I'll have to readjust them.


Share this article :