Showing posts with label Project Server 2013. Show all posts

Tuesday, June 23, 2015

How to deactivate a user with AD account deleted and no AD sync ?


Hi,

Here is a short one. One of our fellow MVP shared with us an issue which might look trivial. 

The background
Project Server 2013, on premise (meaning hosted on the customer infrastructures, not Project Online). The AD sync is not enabled, meaning that the users are created, updated, deactivated manually and not syncronized via the organization AD.

The issue
A user has been deleted from the AD. Since there is no AD sync in Project Server, the user in Project Server is not automatically deactivated. As soon as you don't need to edit anything in the user's profile, this is not an issue. But if you do, now there is an issue.. Project Server needs a valid AD account for every user, meaning that whenever you save a user's profile, it checks for the AD account and prevent you saving the user's profile in case the AD account is not valid (or empty).
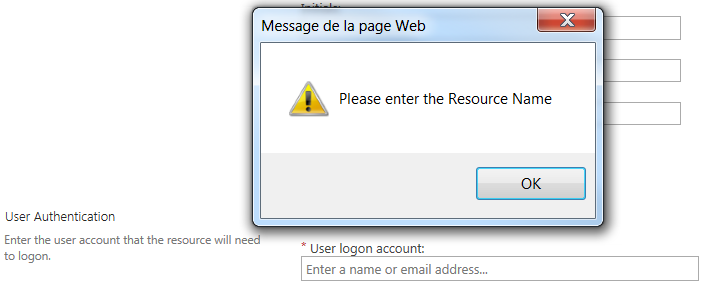
Consequently you just cannot edit anymore the user's profile to deactivate it, neither just delete his AD account, which cannot be empty for a user. If you try so, you'll get the following message:


Figure 1: error message while saving a user's profile with no valid account
Neither you can use the account status (active/inactive) since you'll be prevented from saving the profile.

The workaround
Discussing about this non-sense, another fellow MVP proposes a workaround: entering a valid AD account for this user deleted in the AD, deactivate him and save the resource. This is quite an ugly solution but it does the job, doesn't it?

The solution
Finally a third MVP brough up a solution, THE solution. In the user's profiles list (server settings, manager users), you actually have a button which is intented to deactivating users. We hardly make a stop on this button since it is there since ages and in our mind, what is old is useless and has obviously been replaced by a newer feature. This feature doesn't require to edit and save the resource but directly write in the DB whitout checking for a valid account, which solves our issue!
Figure 2: deactivating a user from the user's profiles list
The limitation
Nothing is perfect... Once deactivated as explained, you cannot use the same method ot reactivate the resource, you do need to edit the user's profile, facing the same issue again. But what would be the need to reactivate a user (not a resource) with no valid AD account?


The conclusions
  1. Do not bypass those good old buttons you are seeing since Project 2003 and never looking anymore. They can be quite useful. For example, the "view effective rights" feature can use very useful for supporting your users in case you have a complex security model. See this blog I wrote some months ago.
  2. An AD account should not be deleted but only deactivated, otherwise it could trigger such issues in connected systems.
  3. Anyway, using the AD sync prevents from having such issues.
  4. The MVP community is extremely powerful, skilled, reactive, imaginative, efficient!

Share this article :

Monday, May 18, 2015

How to bulk change projects' EPT?

Good morning Community!

Nowadays, it is quite challenging to find new interesting subjects for blogging. We are a small but active Project Server community and the quality of blog posts and articles is really impressive. By the way I'm looking forward to share and read articles to and from the community about the next Project Server version.

One subject I did not find much references about is bulk changing projects' EPT (Enterprise Project Type). Moreover I've been asked this procedure many times on the Technet Forums, consequently I'll write down in this blog this procedure so I can share it more easlily. The procedures below are applicable for Project Server 2010, 2013 and Project Online.

As a preamble, I'll share here an excellent blog post about what is an EPT and how it can be configured written by a fellow new MVP, Jérémy Cottino. Note that EPT is quite a key feature helping structuring Project Server data and governance since Project Server 2010.

So where does the need come from? Typically, the project EPT drives the project governance. It will trigger which PDPs (including custom fields, reports, eventually custom code for business rules) will be associated to the project. Note that an EPT can be easily updated. For example, if you need to add a project custom field to an EPT, there is absolutely no need to create a new EPT adding the custom field and associate all projects from the old EPT to the new one. You can simply add the custom field to the webpart in the PDP and it will be added to all projects associated with the given EPT. Changing a project's EPT is more related to a governance change. In my point of view, a typical use case can be when a project has a scope increase and must go from a EPT with simple rules, few custom fields in few PDP to a more complex EPT providing a wider governance with a larger number of PDPs, custom fields, reports, business rules supported by jquery code...

We'll go through 2 methods.

Project Center: change EPT for a single project
First I'll start by explaining the default method to change a project's EPT from the project center. This method is applicable to a single project and cannot be used for bulk changing EPT. Note also that this method does not allow the administrator updating the project's stages if it is associated with a workflow. First navigate to the Project Center and select a project. The trick here is not to click on the project name but on another column of the project's row, otherwise it will open the project details.
Figure 1: opening the interface for changing a project's EPT from the project center
Once the project selected, you can click on the "change" button in the "Project Type" group of the ribbon. The functionnality requires having the "change workflow" global permission. This will open a simple dialog box showing you the current project type and proposing a drop-down menu with the available project types.
Figure 2: changing the project type
If the project is currently checked out, the operation cannot be performed until the project is checked in and the new project type drop-down menu will be greyed out.
Figure 3: dialog box for a checked out project
This operation will associate the project with a new project type. It is important to understand that it will not create, update, delete any custom field values. Meaning that if the source EPT contains custom fields not in the destination EPT, the values will still remain but the field will not be displayed nor used in any PDP. On the contrary, if the destination EPT contains custom fields not in the source EPT, they will be displayed in the new PDP with no value. 

Server settings: bulk changing EPT for a set of projects
The other way to change EPT is through the server settings. This method is quite interesting since it allows the administrator to perform this operation for a set of projects. The procedure starts by navigating to the "change or restart workflows" menu.
Figure 4: bulk change project type from the server settings
This menu will open a new page where you'll be able to select the source EPT, the projects belonging to this EPT and the destination EPT. Note that if you need to update projects having different types, you'll need to perform the operation several times, one per project types. Since this interface is designed in order to manage the project workflow phases/stages, those information are also integrated in the available project information. Here is the detailed procedure:
  1. select the source project type: this will automatically update the project list with the corresponding projects,
  2. select the projects to be updated,
  3. copy them using the arrow in the target list,
  4. select the destination project type. Eventually you can use this functionnality to restart the projects' workflow.

Figure 5: bulk change project type
Note that finally you can choose (if applicable) in which stage the selected projects will jump in.
Figure 6: skip to a specific workflow stage
Now that the procedure is crystal clear (at least I hope...), let's review some important considerations regarding changing the project type. You are aware that the EPT is like an container for the following items and it is important to understand what consequences updating the project type will have on those items.
  • PDP: changing the EPT will associate the corresponding PDP to the project,
  • Workflow: as we just saw, changing the EPT will also allow you (assuming you do it through the server settings and not the project center) updating the project into a given workflow stage,
  • Project template: a project template is associated to an EPT. Since it is just relevant for the project creation, it seems logical that changing the EPT after the project creation will have to impact on the existing project schedule, meaning that the new EPT's project template will not be applied. I would say "hopefully", since it would be a mess (or even impossible) to merge an existing project with actual data with a new project template.
  • Site template: similarly, a project site template is associated with the EPT. Changing the EPT will not have any consequence on the project site. This is the same principle than for the project template. The site template is only used at the site creation thus changing the template on an existing project will not have any consequence. If you do need to create a new project site based on a new template, you can create separately the new site from the appropriate template, migrate the content (this would be a manual operation) and associate the new site to the project using the "Connected SharePoint Sites" menu.
Hope you enjoy it!!
Share this article :

Thursday, April 2, 2015

Active Directory Tip 1 - Group Timer Job : Be Careful of the Save Button

Hello Everyone,

Today I will treat a strange behavior that causes me headaches.
While doing my Project Server 2013 configuration, I came across the configuration of the Active Directory Resource Pool and Group Synchronization.
I then configured the two timer jobs to execute the Resource Pool synchronization THEN the Group synchronization.
Here was my configuration in the central administration:

Project Web App: Synchronization of AD with the Enterprise Resource Pool job :
Project Web App: Synchronization of AD with security groups job :


But, after some days, I see that the group synchronization timer job changed its starting time to 12:00AM.

I finally found that it's NOT an automatic process which is causing the timer job to change change.

In the below screenshot that is available in the ACTIVE DIRECTORY GROUP SYNC OPTIONS  in the  PWA Server settings, you may be used to manually push the save or the save and synchronize buttons.
Be careful, starting from 2013, if you have the Enable Scheduled Synchronization set , this will RESET your Project Web App: Synchronization of AD with security groups timer job to the following:
This new setting may cause some issues as the group synchronization may start before the resource synchronization (I will explain what type of issue in my next post).

You may now to communicate the impact of the action to all people who have the capability of manually launch a group synchronization.

Hope this helps!

Share this article :

Wednesday, March 4, 2015

Want to know more about what's in the reporting Database

Hello all

Long time no see!

Really short blog today, I wanted to report on specific information from the Business drivers and Portfolio priorization.
I used the Database Reference Schema to help me find where to find the data in the Reporting Database.
So, I would like to remind all my colleagues who want to access to Reporting Database that you can use the schema reference that can be found here:
http://blogs.msdn.com/b/project_programmability/archive/2013/01/28/project-server-2013-reporting-database-rdb-schema-reference.aspx 


Hope this will help your report programmings

See you!
Share this article :

Thursday, October 9, 2014

Your Enterprise Global Doesn't Want to Save my Macro to Project Server 2013?

Hello everyone

Sorry with this blackout period.But, I'm still  happy to share interesting things I found.

Currently in a 2013 configuration, I wanted to upload to Enterprise Global two written macros to the EGlobal.
After a lot of trial to save the EGlobal after transferring the macro using the organizer, nothing is uploaded to the server.

Thanks to an old blog written by Pieter Veenstra, I managed to save my enterprise global.

Two possibilities :
Install the HotFix proposed by Microsoft or follow the below process to hack the system!


1- Open your Enterprise Global either using MS Project ( it has moved from PWA settings in 2010 to MS Project menu in 2013)
2- While the Enterprise Global is opened, go to the organizer


3-  Copy the content to the checked-out Enterprise Global

4- Create a dummy task in the enterprise global gantt chart view (be sure to not change the view, it can corrupt in some way your fragile Enterprise Global) 
 5- Delete the same task!

6-Close, save and check-in the Enterprise Global

Final- The Enterprise Global is now well saved to the server


Share this article :

Thursday, July 24, 2014

Delegation in 2013 - Don't Misundurstand the Project Pro Message

One interesting feature Project Server has introduced in 2010 is the capability to substitute yourself to someone else using the delegation.
By the way, you cannot use it while in SharePoint Permission mode

One of the drawback is that this is only working in PWA interface (except for the Business Intelligence part).
Consequently, Project Professional will not allow you to connect to a server while you have an ongoing delegation session.
So now, let's imagine you're in a delegation session in the name of this famous John.

Then, you try to open your MS Project Pro connected to your server and, Surprise, a misleading message appears.

It's not that wrong message as you do have inadequate permissions but not really explicit!

So, next time a user call you with this kind of message, make sure they are not using the delegation in the meantime before trying to check network or permissions to the server!

Regards!
Share this article :

Tuesday, June 3, 2014

View effective rights tool: now integrated to Project Server 2013

Much has been said on the 2013 release of Project Server, so it's kind of ambitious to write a brand new blog on the topic those days! But let's try!
Some of you guys surely faced the situation where a resource cannot access an object in Project Server? Or have been called on Monday morning by a gently customer and seeing that the security has been tweaked making a real mess?
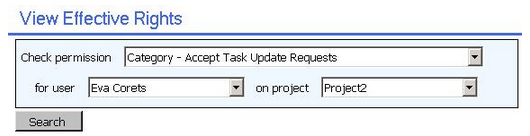
Project Server 2007 PRK (Project Resource Kit) used to propose a "View effective rights" tool that allows the Project Server administrator troubleshooting issues regarding security settings and access control.

Here is basically what did it look like:
Figure 1: "view effective rights" tool in the PS2007 PRK

This tool has vanished in PS2010 (as far as I know..) and it is with a great pleasure that I'm presenting today the "view effective rights" functionality integrated to Project Server 2013!

It is pretty simple to use it, assuming of course you're using the Project Server permission mode. Just navigate to the server settings, then manage users. After selecting the culprit user, you can click on the "view effective rights" button.
Figure 2: "view effective right" in "manage users"
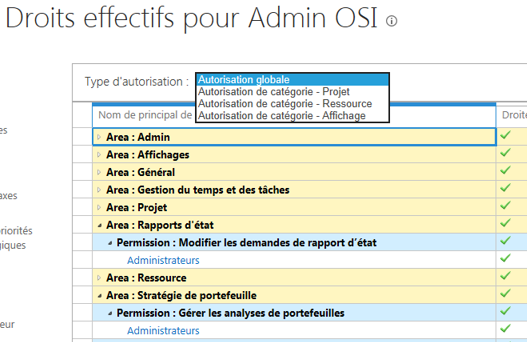
Then you'll be able to select from the drop-down list the type of rights you want to troubleshoot :
  • Global permissions,
  • Category rights for projects,
  • Category rights for resources,
  • Category rights for views,
Figure 3: type of rights selection
Figure 4: category rights on projects
Figure 5: category rights on resources
Figure 6: category rights on views

Try it and as an administrator you'll soon use it on a daily basis!

Share this article :

Monday, May 26, 2014

Master the Multiple Choice Custom Fields in your Excel Reports!

It happens sometime that there is a need to report information stored in a Multiple Choice Custom Field:

If this happened to you, you must have seen that the custom field is not part of the standard views such as MSP_Project_UserView.
You will have instead a specific view for each Multiple Choice Custom Field named MSPCFPRJ_<CustomFieldName>_AssociationView.

Then, you will have to write down a clever request giving you the list of choices made by projects.
Don't worry, you can find this clever information right below!
SELECT Proj.ProjectName,
       lt.MemberFullValue AS 'VLookupField'
FROM dbo.MSP_EpmProject_UserView AS Proj 
LEFT OUTER JOIN [dbo].[MSPCFPRJ_<YOUR_CUSTOM FIELD NAME>_AssociationView] AS MVassoc -- view for multi value field 
ON proj.ProjectUID = MVassoc.EntityUID 
LEFT OUTER JOIN dbo.MSP_EpmLookupTable AS lt 
ON MVassoc.LookupMemberUID = lt.MemberUID 
order by    ProjectName asc

I would recommend to do the post treatment in the excel itself. it would be possible to link the below request with the one that will gather all your project information but, be careful, it will multiply the number of lines per the number of choices made on projects.

Then, I recommend to create a specific tab in your excel report to show the information
This will return you something like this while rendered in an Excel pivot table with data connection:
Be sure to have checked the "Repeat All Items Label" check box

Now, you may want to return these information on another sheet gathering other project information.
To do so, I will create a one cell concatenation of the selected project.
First step is to gather the information based on the project on several cells

The formula to gather several lines of a specific project is quite ugly:
{=IF(ISERROR(INDEX($A$1:$B$5000,SMALL(IF($A$1:$A$5000=$G$4,ROW($A$1:$A$5000)),ROW(1:1)),2)),"",INDEX($A$1:$B$5000,SMALL(IF($A$1:$A$5000=$G$4,ROW($A$1:$A$5000)),ROW(1:1)),2))}

$A$1:$B$5000 = Where to search
$A$1:$A$5000 = Where are the project names
$G$4 = The project name to search
1:1 = The line number you want to fetch
Be careful, this is array formulas, that means that you will have to click on CTRL+ENTER to validate your formula!

Here is the overall list of formulas, as you can see, only the parameter number changed (I return here a maximum of 12 entries)

To finish, the easiest part is to put all that in a single cell with the following formula.
To render it nice, I created a second column containing the separator so that a separator is only created while a value is returned. I then concatenated the overall in a cell


Separator cells are looking if there is a value after the current one and if yes displays the separator:
=IF(G6<>"",$H$19,"")

Result cell is a concatenation of the entire table:
=CONCATENATE(G5,H5,G6,H6,G7,H7,G8,H8,G9,H9,G10,H10,G11,H11,G12,H12,G13,H13,G14,H14,G15,H15,G16)

Tips: you can use =CHAR(10) as separator to render in a cell on several lines

You are now able to render multi-choice custom field in your excel services report!

Find here an example of all I just said in an excel file!

Help from Microsoft : http://msdn.microsoft.com/en-us/library/office/ee767688.aspx
Share this article :

Monday, May 12, 2014

Multilines administrative time categories in PS2013 timesheet

Most of the timesheet improvments brought by Project Server 2013 are for the end users. But anyway what's a good for the end user is obviously good for the administrators, isn't it? Since we do like those "win-win" new features, we will go in this new post through the multiline administrative time categories. Note that in PS2013, the administrative time has been renamed "non-project activities".

A common need from our customers is the ability to manage in their timesheets tasks that are not personal tasks, neither on a specific project. That's why the administrative time was introduced since 2010 version. As it is a pretty straight forward and simple feature, you might ask "what could be new with the administrative time feature?".

So let me ask how do you manage support activities with tickets? The best solution is obviously an integration with Team Foundation Server, but you might not have it in your organization or you might not have to budget for the PS/TFS integration. Thus the common way to manage tickets in previous version was to manage a specific support project, which was tedious due to the project's granularity.

The new multiline feature expands the administrative time categories to take into account this type of work allowing multiline to be added to an administrative category in a given timesheet. Below is the procedure to implement multilines administrative time.

The first step is to define your new administrative categorie (non-project activity) in the server settings, checking the "Allow Multipe Lines" checkbox. In this case, it is adviced to flag the ticket activity as "approval required". Note also that the administrative time categories can now be department specific.
Figure 1: new multiline administrative time category creation

Then when the user goes to his current timesheet, he'll be able to insert one or more tickets activities not related to any project, giving a custom name.
Figure 2: current user timesheet
Figure 3: inserting a noin-project activity in the current timesheet
Picking up the "ticket" category, the user will be able to enter a specific name for the ticket activity.
Figure 4: entering a custom name for the "ticket" activity
 After entering as many tickets as required, the timesheet will look like this:
Figure 5: timesheet with 3 "ticket" activities
Grouping by billing category will give to the user a clearer view of the ticket activities in the timehseet versus the other administrative lines and the standard (project) lines:
Figure 6: timesheet grouped by billing categories
As another nice improvment, we can mention that the non-project lines are now carried forward to timesheets for future periods, supporting in the best way possible this new multiline administrative time categories.

Hope you'll try and enjoy it. I'll be pleased to hear from you other use cases than the ticket use case presented here in this post.
Share this article :

Friday, May 9, 2014

Do not open Projects in Edit Mode unexpectedly in Project Server 2013


If you are used to open projects in Project Professional in 2010 by double clicking on a project in the open window, you should know that the project is by default opened in edit mode and though checked-out.
Project Server 2013 is bringing here a nice improvement that I, as administrator, am really happy to welcome.
All Projects in Project Professional are by default opened in read-only mode and can be opened in edit whenever you want.


Then, while opened in Read Only , as for Office in 2010 and 2013, Microsoft introduced the "Notification bar" in Project 2013 allowing you to check-out the file.


I already hear you saying: "What about my modifications made while in read-only?". Don't worry, Project is clever enough to just check-out the project without reloading it. Any modification made in read-only mode are kept while checking out the project file


What if a co-worker changed the project in the meantime? Project will ask you to save you changes.


if you choose yes, it will ask you to find a place to save it before checking-out the file


You will have to pay attention while using the "Recent Projects" opening, by default, it will check-out the file for you!


From PWA the options are still the same : while clicking on the little workplan icon, the project will open in Edit mode to your computer MS Project and clicking the project link will open in Read only in PWA.

If you want to open in another manner, you'll have to select the line (not clicking the project link but next to it, this, I guess you're familiar) and select the proper open option from the rubban

You will never again lock a file without noticing it!
Share this article :

Thursday, May 1, 2014

Timeline in Project Web Access 2013 : new nice feature!!

The timeline in MS Project Pro 2010 has been a really great new feature which was strongly appreciated by project managers when they need to quickly extract a graphical overview of their project plans for executive committees presentations.

But what about a portfolio timeline view including multiple projects? That was not possible with Project Server 2010. Hopefully Project Server 2013 brought a bunch of nice new features such as the timeline in PWA, meaning in the proejct center and in the project schedule page.

So in this post, not much writing but just a quick description of this new feature quite easy to use and with a extremely nice render!

Below is the project center (still in french, I promise I'll get an english PWA as soon as possible...), where you can select a project in the grid and click on "add a project" in the "project" tab on the ribbon, under the "timeline" section. Be aware that if you click on the project name hyperlink, you'll go directly to the project details, so just click on another cell next to the project name.

Figure 1 : Project center timeline with the "add to timeline" button

When you click on the timeline itself, a new contextual "timeline" tab appears in the ribbon. It allows you formatting the bars with custom fonts or colors. You can also choose to hide or display some items like dates or lock the timeline width. Finally selecting a specific bar in the timeline, you can remove it or display it as a legend.

Figure 2 : "Timeline" tab with formatting options in the project center ribbon

Going to the project detail in the schedule page, you'll be able (assuming you're in edit mode) to select a task and add it from the "add to timeline" button.

Figure 3 : Project detail timeline with the "add to timeline" button

Note that selecting high level phases of your project will give you a really nice result. Similarly to the project center, you can click on the timeline to display the "timeline" tab of the ribbon in order to do some "sexy" formatting.

Figure 4 : Timeline" tab with formatting options in the project detail ribbon

Note : (read carefully the edit at the end of the post, the first part of the sentence below is erroneous but I keep it as is to keep track of the post history)
As an important comment I'd mention that whereas the project center timeline is user specific (stored in the personal settings), the project details timeline is project specific, meaning that modifying it requires checking out the project in PWA or MS Project Pro. The project details timeline can then be seen from 3 different places :
  1. PWA, editable when checking out the schedule (figure 3 and 4),
  2. MS Projec Pro, editable when checking out the project (figure 5),
  3. The project site welcome page, consultable only (figure 6).
Figure 5: project  details timeline in MS Project Pro

Figure 6: project  details timeline in in the project SharePoint site


Hope you enjoy this nice new feature that brings to the PWA 2013 a brand new view at portfolio and project level. Try it and you'll love it!

EDIT June 10th 2015: Damien brings a useful contribution in his comment below by mentionning that the Project Center timeline is NOT user specific since it is stored in a Sharepoint list.

Share this article :