Showing posts with label MS Project. Show all posts

Wednesday, October 4, 2017

Highlight days in a Gantt

As moderator of TECHNET forums about Project Server / Online, I often have interesting questions which push me digging concerns I would never have considered.

One recent question I had was as followed. So back to MS Project basics, this is quite simple and immediate to set up but it can bring visibility to stakeholders whom you're sharing the plan with.
"How could we highlight days on an existing task? For example, customer visit on site, strike, MEP, etc... We don't want to create additional tasks or work, neither to create exceptions."

So before going through the steps, here is the final result you can achieve with a 5-minutes configuration.

Starting with the following 10-days new task:

First concept to understand: the bar styles. If you double click on the Gantt chart, you'll open the following configuration box:

You can see that each type of task (normal, manual, critical, milestone, summary, baseline, etc...) has a specific style which can be customized. You might remember that I wrote a post a while ago about customizing bar style based on custom flags. You can also see that each style has a start and a finish. For standard tasks, it is obviously [start] and [finish], whereas for baseline tasks, this is [baseline start] and [baseline finish]. This allows displaying baseline above the task as shown below. 


You understand that mastering bar styles can be quite useful whenever you fall into Gantt customization. So back to our use case, the principle is to use custom start and finish dates. 

1- You can start with the start1/finish1 but you could use additional custom dates if you want to highlight multiple slots.

2- Then customize bar styles with start and finish dates 1 and 2. Note that the new bar styles have to be created BELOW the standard task style so it will be shown on top. Otherwise it would not be visible.

Here is what you get, clear and simple:

3- You might want to add a label as an explanation for highlighting those days. You can use the text 1 and 2 to enter text, and set those custom fields as text displayed on top or below the bar.

Here is the result:

Leonardo da Vinci used to say: "Simplicity is the ultimate sophistication", what do you think?

Share this article :

Wednesday, December 7, 2016

Heads up about Project certifications

Hi dear Project experts,

You recognize those logos? Have them, want them?
We are all convinced that having Project certifications is definitely a plus in order to be recognized as Project experts and are required to be Microsoft certified as a company. Moreover, it assures to our customers that we know what we are doing. Off the record, this is not always the case and not all certified professionals are Project expert, but this is another subject...

Anyway, I'm here today to give you a quick heads up on the new certification plan for Project. We had a good summary by Yuval Stern on the Yammer group, but since not all of you might have the information, here is what you need to know about the new plan.

  • Exam 74-343 "Managing Programs and Projects with Project Server 2013" will be retired and replaced by Exam 70-348 "Managing Projects and Portfolios with Microsoft PPM". The beta version is accessible here.
  • Exam 70-331 "Core Solutions of Microsoft SharePoint Server 2013" will be retired and replaced by Exam 70-339 "Managing Microsoft SharePoint Server 2016". This one is a tuff one.
  • Please note that Exam 74-343 "Managing Projects with Microsoft Project" retains the same exam code and has been refreshed for better alignment with the latest Project client version. Good news if you already have it, it is still applicable!
Another good news? You can follow 2 free trainings on MS Project and Project Online through EDX, the Microsoft training partner. 


I've not been following the training but I had the feedback that they are pretty complete and well organized.

Get certified! 

Share this article :

Tuesday, November 29, 2016

Work on summary task different from the sum of sub-tasks work! What is happening??

Hi,
Back to the basics, I'll talk today about a support case I got today in MS Project. Always good to go back to scheduling challenges.
The issue? When running odata reports in Excel, a customer tells me that the work on the summary task is greater than the sum of the sub-tasks work.

Something like this:


2 tasks with 4 and 2 days of work, the work on the summary task should be 6 days and not 12 right? Here were my first thoughts that I submitted to my customer :

  • a filter might have been applied so some of the sub-tasks might not be visible. NO!
  • the tasks might not be sorted along the ID, so some sub-tasks might be located at another place in the WBS. NO!
  • the summary task might be manually scheduled. NO! (anyway this wouldn't have helped since even if it was the case, the sum should have been correct).

Any idea? Guess what, I've been telling for 10 years to my customers NOT TO ASSIGN RESOURCES ON SUMMARY TASKS, but I just didn't think about it! What puts me on the wrong way was the screenshot I received from the customer, similar to the one above: no resource is displayed near the summary task bar. Unfortunately, I didn't remember that the summary task bar style does not display any information around the bar.

So here is what happened:


Without any resource on the summary task, you get 6 days of work. If you add a resource on the summary task with the default unit (100%), on a 6-days duration task, you'll get 6 days of additional work, which makes 12 days in total.

Here is how 2 + 4 = 12 !

So keep that in mind, this is really a worst practice! Not convinced? I could give you several examples. Quite often, the use case about assigning resources of summary task is when you don't want to assign the same resource on 10 tasks, you think this is simpler to directly assign it on the summary task. Here is a simple reason why you should not: it can create ghost over or under allocations

Here is a use case with a resource assigned on 2 task with a positive lag. You can see that I have a duration of 8 days, but 6 days only of work since I have a 2-days lag.


If I assign the resource on the summary task which has no lag, the work is calculated based on the summary task duration (8 days). I thus have 8 days of work, which is not what I want.


Similarly, if I put a negative lag, meaning that the task cannot start earlier than 2 days before the predecessor is finished, I get a 4-days duration but 6-days work since 2 days are in parallel. Moreover, I have an over allocation since resource A is assigned on both task the 2 first days.


If you assign resource A on the summary task which is 4-days duration, you get 4 days of work instead of 6 and no over allocation.


Hope you are now convinced that there takes a lot of verifications when assigning resources of summary tasks. You might anyway need or want to do it (even if I do recommend not to do it), but be aware of the traps and consequences.

Have a good scheduling!

Share this article :

Thursday, February 18, 2016

Tell me what you want to do....

Since a little while, Microsoft and other tech companies are trying to make people ask instead of clicking. This is the case for Siri, Cortana, Google! But now, it comes to our tools. Office 2016 suite is now having this great functionality that you can get out of you ribbon : "Tell me what you want to do"

As I am a big fan of using the search button in Windows 10 and typing, I am no more using the old list of programs we used to have since Microsoft UI was born!

In this blog, I just wanted to highlight cool things that you can do without touching your mouse in Project Professional 2016 or Project Pro for Office 365.

Before starting, you have to know that you can activate the search box in typing Alt-Q

as an example, inserting a new task. it is not the best example because you would just have to press the insert button on your keyboard. But anyway, just type Alt-Q , task, ↓, à, Enter. and your task is created. You can also do some other actions on the tasks as proposed. If you choice is not here, refine your request.

Same to set a baseline or act on a baseline : Alt-Q , baseline, ↓,↓,à, Enter. The set baseline menu is showing up

You can also generate reports directly from the Q&A field:
Note that the answers are based on the context you are in. a gantt chart view will not give you the same answers as a Team Planner view

Now, Microsoft just need to integrate it to Cortana and I will more than happy.

Enjoy that feature
Share this article :

Thursday, October 29, 2015

Project Virtual Conference 2015: view my session in replay!

You couldn't attend my session on cost management at the Project Virtual Conference?? All sessions are available on-demand. Just log in with your credentials and enjoy!!

Here is the abstract of my session and the replay below.

"In this session, I’ll make a focus on cost management in MS Project. Intended to give to the end-users an overview of the various cost management features provided by the latest versions of MS Project, I’ll go through (among others) the cost resources, the budget resources, the cost rate tables and the reporting features for supporting cost management in MS Project.The objective of this session is to give clues to the day-to-day challenges project managers and PCOs face in terms of cost management while scheduling theirs projects, with the constraints of setting, tracking and reporting on costs."


Share this article :

Monday, August 24, 2015

MS Project: how to get more than the 10 default local custom fields?

Hi,
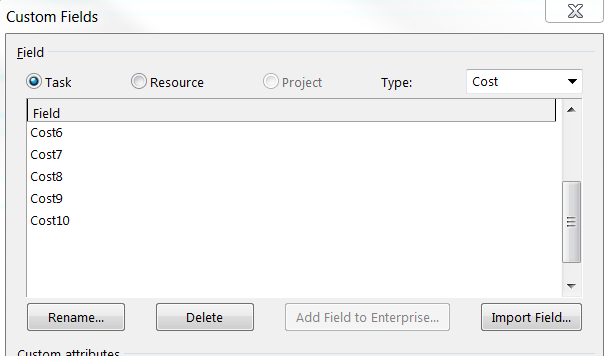
Those days, I've been playing around with the Enterprise Global (as you can also see in another recent post), quite a while!! Recently a user who was working with MS Project standalone (meaning not connected to Project Server or Project Online) had the following concern. He needed to use more than the 10 cost custom fields. Indeed if you go to the project tab and click on "custom fields", you'll see that you are limited to 10 cost fields. 
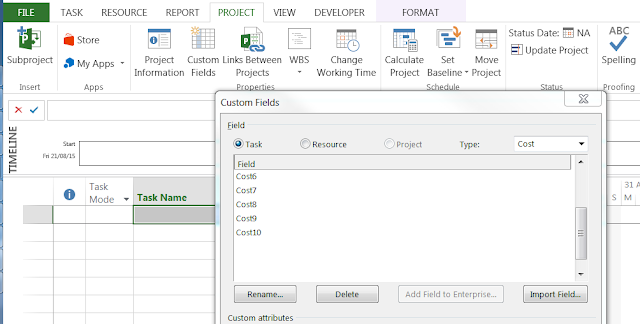
Figure 1: cost custom fields in MS Project

The first workaround is obviously to use text custom fields and/or number custom fields. But there are some limitations:
  • the number custom fields cannot be displayed as cost with the currency symbol,
  • the text custom fields cannot be rolled up unless you write some formula or do some VBA.
So how to have more than 10 cost custom fields? You need to have in your professional network someone who has access either to a Project Server or Project Online instance. Indeed you have no other limitations than performance for enterprise custom fields. This means that you can create almost as many cost custom fields as you need. But this is actually not as simpler as it might be. Indeed if you check out the enterprise global and open the organizer on the "fields" tab, you'll see that you cannot select either the global.mpt or the checked-out enterprise global. Thus you cannot copy items into the local project arghh..

So here are the steps: 

1- Create the extra cost enterprise custom field(s) on a Project Server / Online tenant
This is the first step, quite straight forward. Connect to your instance, go to server settings and create the extra enterprise cost custom field(s). Be sure to configure the rollup at summary task level as needed, for example with a sum.
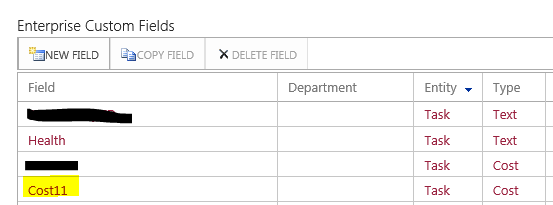
Figure 2: extra cost enterprise custom field created from the server settings

2- Save the global items locally
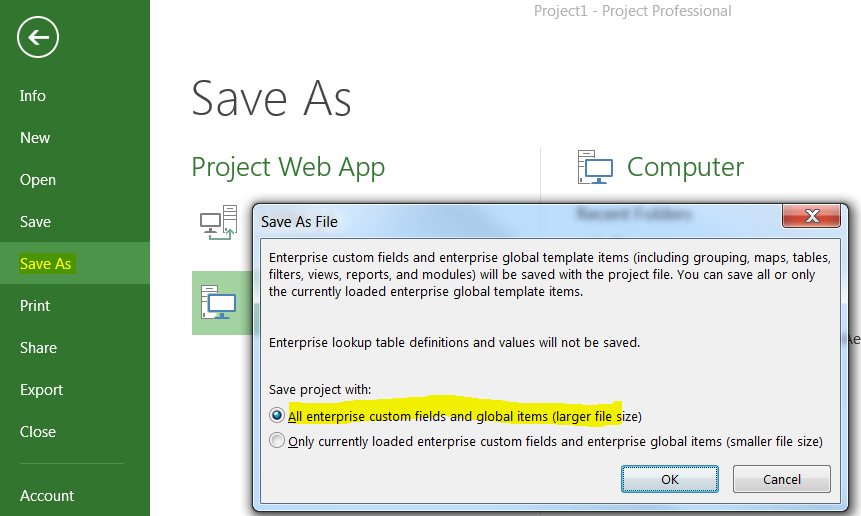
Open MS Project Pro connected to the given PWA instance and save a blank new project locally. Be sure to save in the local file all enterprise custom fields and global items.
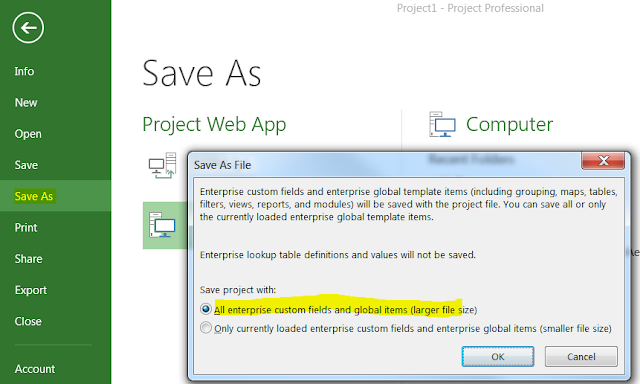
Figure 3: project saved locally with the global items
You can now close MS Project.

3- Copy the local extra field into the global
Now the issue is that you'll have ALL enterprise custom fields in your local file. This might not be suitable since the initial need comes from a user who is working in a standalone mode which is more than likely not your enterprise context. Thus he probably doesn't want to be polluted by all your enterprise metadata. 
Logically this last operation should be done by the initial user which has the need since it will copy the extra cost field(s) in his global. So he has to reopen MS Project not connected to Project Server and open the local file which will contain ALL enterprise custom fields from your instance. Finally he opens the organizer and copies the extra custom field(s) from the local file to his global.mpt. You can also do it by yourself: open the local file, copy only the extra cost fields to your global, open a new blank file and save it locally, eventually overwriting the previous file containing all the enterprise custom fields.
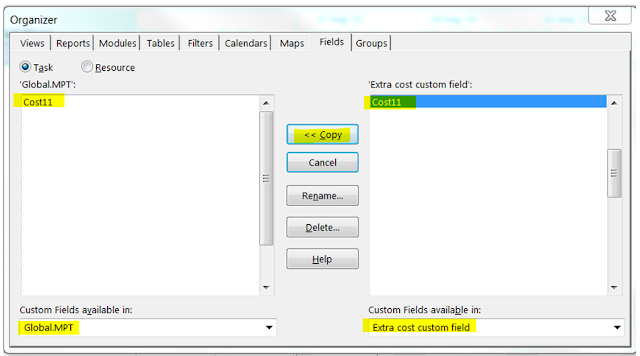
Figure 4: copy the extra cost field from the local file to the user's global
Now the user will have his extra cost custom field(s) in his global for any new project, having more than the 10 initial cost custom fields. Here is the final result with an extra 20 cost custom fields in addition to the 10 default local ones.
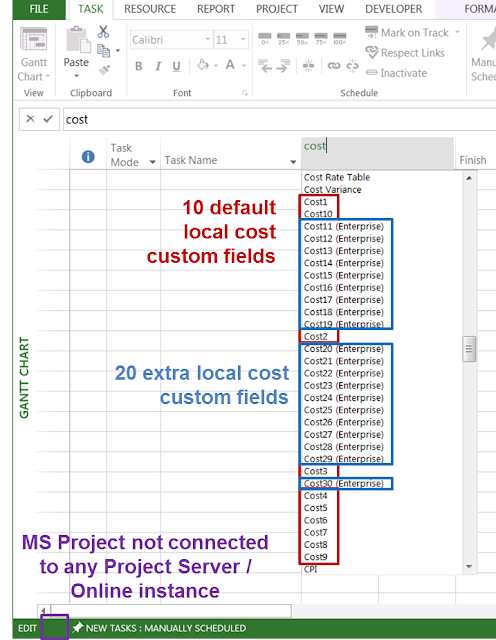
Figure 5: 20 extra cost custom fields available locally in addition to the 10 default local cost custom fields

Note that in the image below, even if I started MS Project not connected to Project Server, I still have the 20 extra custom fields (from 11 to 30) flagged as "enterprise". Just for information, if connected to a Project Server / Online instance, you'll have the following icon in the status bar:
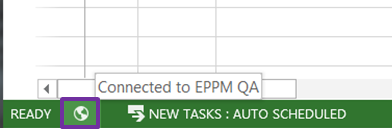
Figure 6: icon in the status bar when connected to Project Server / Online
Any limitations?
If you go to the project tab then custom fields, you'll not see those 20 "enterprise local" fields, thus you cannot configure anything such as the rollup. You have to think about all settings before doing the operation.
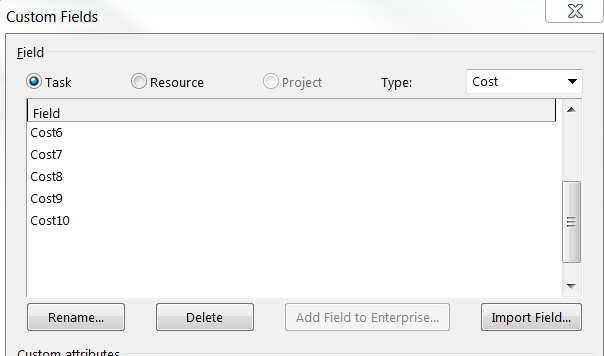
Figure 7: the 20 extra custom fields not appearing in the list of cost custom fields
Another limitation to mention is that while copying the extra fields to another project file, the user in question will see that all settings about sum and rollup are lost. So basically the principle is to stick to the initial file and reuse it.

What do you think? Do you have another ways to extend MS Project capabilities in a standalone context?

Share this article :

Monday, February 16, 2015

Tip for resource forecasting: show assignment units as a decimal

Not all our readers use Project Server, thus this post is only related to MS Project. Indeed Project Server proposes advanced features to enhance capacity planning and forecasting through tools such as the resource plan which is very convenient in an early planning phase. It allows entering FTE by skills (or named resources evenif it makes less sense) in order to plan your resource demand. In my screenshot below, work is displayed in hours but it can also be managed in FTE or in days.
Figure 1: Project Server resource plan
Does that mean that MS Project (standalone) users cannot achieve such a goal?? I don't think so, since MS Project still proposes a large set of planning features. I'll show you in this short post how a very simple option in MS Project allows you visualizing in a better way FTE required for a project.

You are all aware of the unit concept which is meant to give the ratio the resource will work on the task. By default this is configured as a percentage.
Figure 2: Assignment with units as a percentage
In the example above, I have assigned 5 full-time analyst on my task, and I can check the work calculated accordingly by Project.

Having provided MS Project trainings since years now, I've had a lot of questions about this assignment unit. It is not quite difficult to understand but it requires kind of self thinking to masterize the concept. For example, you never say "I'll assign 250% of  designer on this task" but "I'll assign 2,5 designers full-time on this task".

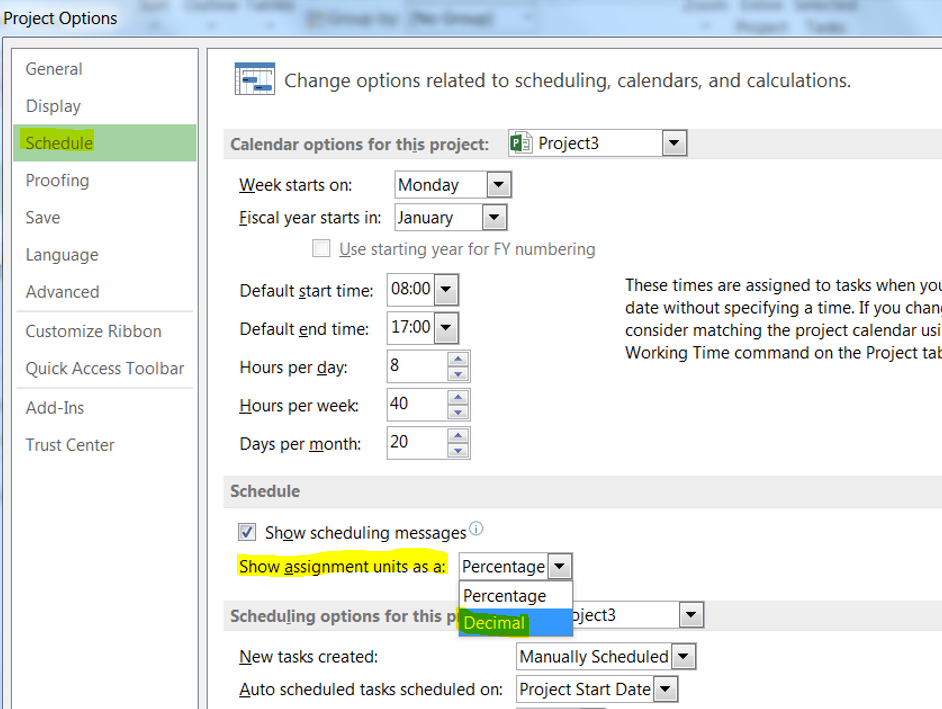
This is where I'm heading to: Project allows you doing such a wonderful trick. Going to file, options, schedule, you'll be able to set the assignment units as a decimal:
Figure 3: setting the assignment units as a decimal

Then I can happily forecast the resource demand on my project more easily:
Figure 4: creating an assignment with decimal units
Note that it changes absolutely nothing to how Project will calculate the assignment data, it is just more convenient for certain users and might make easier the resource forecast phase.
Share this article :

Tuesday, July 8, 2014

Manage Calendars using Recurrence Pattern

One of the challenge of planning with MS Project is to be accurate in the dates and vacations.
Though, statutory holidays coming every year needs to be taken into account!

Let's take the example of the 4 of the US holidays found in Wikipedia:
Official Name Date
New Year's Day January 1 (Fixed)
Birthday of Martin Luther King, Jr. Third Monday in January
Inauguration Day First January 20 following a Presidential election
Good Friday The Friday before(western) Easter
Interesting in those holidays is that they happen every year. Some can be set recurring, some not:
January first is always the January first (hopefully for those who are partying all New Year eve).
Martin Luther King, Jr. birthday is the 3rd Monday of January. Strange for an anniversary but still, the public holiday is like that.
For the Inauguration Day, this is not possible to predict when it will happen, recurrence will not help in that case
The Good Friday is arriving before Easter, which is again unpredictable and though, the recurrence will not help either.

MS Project and though Project Server is proposing a nice feature in setting recurrence to exceptions in calendar. 
You will first have to go to the Calendar setting:

After creating an exception, while clicking to the details detail button, you will get the following window:

Now, see how to set the above defined recurring and not recurring holidays.
January first:

Martin Luther King, Jr. birthday:

Inauguration Day:

Good Friday:


Now you can declare enterprise calendars with mostly recurring statutory holidays. Some will still need to be entered one by one.
Obviously, this can be configured for Project Server calendars in going to enterprise calendars in the PWA settings

In the next future, I will share with you some calendars until 2020!


Additional note thanks to Gary Chefetz comment:
While creating recurrence, you will have to identify exceptions such as first of January falling on a Sunday. Then a creation of a specific calendar exception will be necessary. The easy way to identify such case would be to check each calendar exception year after year and verify which day it falls.

Furthermore, try to limit your calendars horizon to your projects horizon to not overload the server and the database with unnecessary information


Hope you will love to avoid defining calendar exceptions every year!
Share this article :

Wednesday, June 11, 2014

How to disable in MS Project Pro the "new tasks are created in ... scheduled mode"

A quick one for this week! More than an article, let's call it a tip. We are all experts that deal with advanced features to answer elaborate customer's business needs. BUT.... The user acceptance is one of the key success factor. And after deploying Project Server since 2006, I've come to the conclusion that a few little tiny details can promote or limit this acceptance.

So what about this very annoying notification each time users (actually including yourself as a Project Server SME) open MS Project Pro?
Figure 1 : new tasks creation mode notification message
I actually lived with this notification with a fatalistic acceptance unless the question was raised and answered on the TechNet Project forum by one of our excellent MVP (Julie Sheets, not to mention any names...).

YES YOU CAN deactivate this notification, god!!

Once MS Project is opened (and after the notification disappears argghh), just right click on section which displays the scheduling mode for the new tasks:
Figure 2: scheduling mode for new tasks

You'll get a menu that proposes various options for customizing the status bar. Just deselect the "new task mode notification":
Figure 3: unselect the "new task mode notification" option in the status bar customization menu

Et voilà!!
Share this article :