Hi,
Those days, I've been playing around with the Enterprise Global (as you can also see in another recent post), quite a while!! Recently a user who was working with MS Project standalone (meaning not connected to Project Server or Project Online) had the following concern. He needed to use more than the 10 cost custom fields. Indeed if you go to the project tab and click on "custom fields", you'll see that you are limited to 10 cost fields.
Those days, I've been playing around with the Enterprise Global (as you can also see in another recent post), quite a while!! Recently a user who was working with MS Project standalone (meaning not connected to Project Server or Project Online) had the following concern. He needed to use more than the 10 cost custom fields. Indeed if you go to the project tab and click on "custom fields", you'll see that you are limited to 10 cost fields.
 |
| Figure 1: cost custom fields in MS Project |
The first workaround is obviously to use text custom fields and/or number custom fields. But there are some limitations:
- the number custom fields cannot be displayed as cost with the currency symbol,
- the text custom fields cannot be rolled up unless you write some formula or do some VBA.
So how to have more than 10 cost custom fields? You need to have in your professional network someone who has access either to a Project Server or Project Online instance. Indeed you have no other limitations than performance for enterprise custom fields. This means that you can create almost as many cost custom fields as you need. But this is actually not as simpler as it might be. Indeed if you check out the enterprise global and open the organizer on the "fields" tab, you'll see that you cannot select either the global.mpt or the checked-out enterprise global. Thus you cannot copy items into the local project arghh..
So here are the steps:
1- Create the extra cost enterprise custom field(s) on a Project Server / Online tenant
This is the first step, quite straight forward. Connect to your instance, go to server settings and create the extra enterprise cost custom field(s). Be sure to configure the rollup at summary task level as needed, for example with a sum.
 |
| Figure 2: extra cost enterprise custom field created from the server settings |
2- Save the global items locally
Open MS Project Pro connected to the given PWA instance and save a blank new project locally. Be sure to save in the local file all enterprise custom fields and global items.
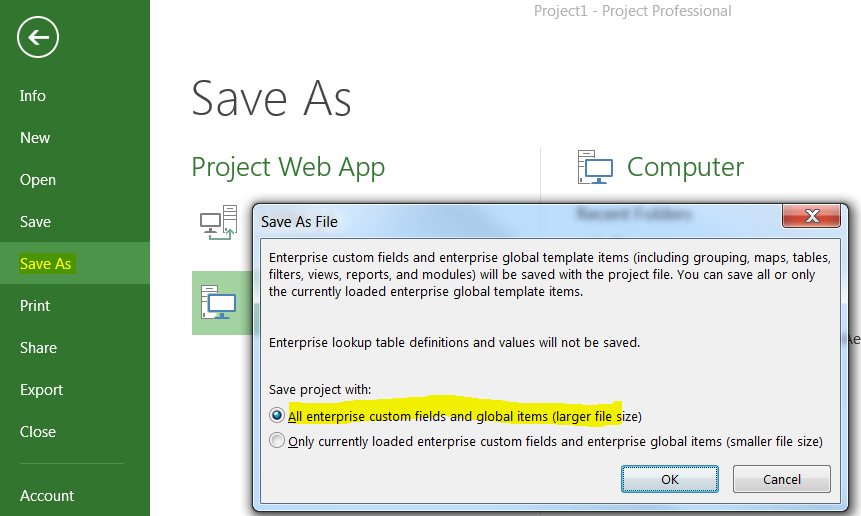 |
| Figure 3: project saved locally with the global items |
3- Copy the local extra field into the global
Now the issue is that you'll have ALL enterprise custom fields in your local file. This might not be suitable since the initial need comes from a user who is working in a standalone mode which is more than likely not your enterprise context. Thus he probably doesn't want to be polluted by all your enterprise metadata.
Logically this last operation should be done by the initial user which has the need since it will copy the extra cost field(s) in his global. So he has to reopen MS Project not connected to Project Server and open the local file which will contain ALL enterprise custom fields from your instance. Finally he opens the organizer and copies the extra custom field(s) from the local file to his global.mpt. You can also do it by yourself: open the local file, copy only the extra cost fields to your global, open a new blank file and save it locally, eventually overwriting the previous file containing all the enterprise custom fields.
 |
| Figure 4: copy the extra cost field from the local file to the user's global |
Now the user will have his extra cost custom field(s) in his global for any new project, having more than the 10 initial cost custom fields. Here is the final result with an extra 20 cost custom fields in addition to the 10 default local ones.
Note that in the image below, even if I started MS Project not connected to Project Server, I still have the 20 extra custom fields (from 11 to 30) flagged as "enterprise". Just for information, if connected to a Project Server / Online instance, you'll have the following icon in the status bar:
Any limitations?
If you go to the project tab then custom fields, you'll not see those 20 "enterprise local" fields, thus you cannot configure anything such as the rollup. You have to think about all settings before doing the operation.
 |
| Figure 5: 20 extra cost custom fields available locally in addition to the 10 default local cost custom fields |
Note that in the image below, even if I started MS Project not connected to Project Server, I still have the 20 extra custom fields (from 11 to 30) flagged as "enterprise". Just for information, if connected to a Project Server / Online instance, you'll have the following icon in the status bar:
 |
| Figure 6: icon in the status bar when connected to Project Server / Online |
If you go to the project tab then custom fields, you'll not see those 20 "enterprise local" fields, thus you cannot configure anything such as the rollup. You have to think about all settings before doing the operation.
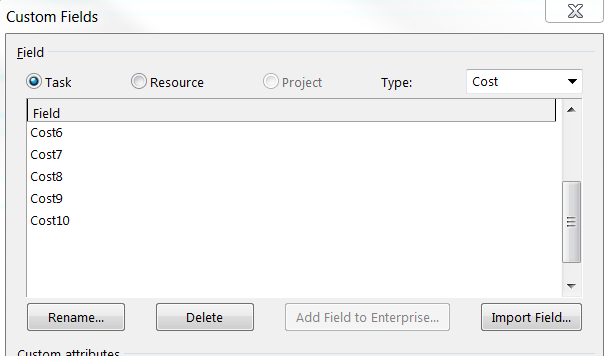 |
| Figure 7: the 20 extra custom fields not appearing in the list of cost custom fields |
Another limitation to mention is that while copying the extra fields to another project file, the user in question will see that all settings about sum and rollup are lost. So basically the principle is to stick to the initial file and reuse it.
What do you think? Do you have another ways to extend MS Project capabilities in a standalone context?