Friday, July 3, 2015

My first Power BI report without Excel

Hi Project addicts!

We recently had a lot of new announcements about PowerBI, embedding components such as Power Pivot, Power Query, Power Map, enabling auto refresh, etc... So I decided to roll up my sleeves and get into it with my new Project Online demo tenant. Moreover, since I'm not a developer, I'm always willing to discover reporting tools which don't require any development skills.

Funny thing (or not...), I still do not have Excel 2013, I'm stuck with an old version of Excel 2010, preventing me from installing the latest Power X add-ons to play with...

So that's it ? Obviously not, since Microsoft Power BI preview is now available, allowing you to designer powerful dashboard without even using Excel. See this reference:

So how does it work? 

First connect to https://app.powerbi.com with your O365 admin account. Once connected, you'll be able to download Power BI Designer. It is a client application which allows you connecting via odata protocol to your Project Online project data.
Figure 1: download Power BI Designer from Power BI Preview

You'll find all relevant information here:
You'll see that Power BI designer looks like Performance Point, in this old fashion presentation as well in the process of creating dashboards, eventhough it provides much more features and capabilities.

In Power BI Designer Preview

Once downloaded, you first create your odata connection on your Project Online instance. For the example, I retrieved projects data using the following URL:


Then I won't go into much details since there are many blogs explaining the process. Here is a very good one, very detailled:

Since I'm not a developer, I did a simple example, not playing too much with the query part but simply doing simple drag and drop operations and some formatting.
Here my first page:
Figure 2: dashboard's first page
And the second one:
Figure 3: dashboard's second page

Note that you have more advanced features such as the maps, or you can also edit the query if you are willing to, create relationships, measures and so one...

Once done, you can save your dashboard as a Power BI file (pbix format).

In Power BI Preview
Back in Power BI Preview, you can upload your dashboard. As you can see, uploading my dashboard from local drive to Power BI preview will create a data set, a report and a dashboard which can be shared will my colleagues.


Finally, I'll like to share 2 interesting features:

1- Q&A: you can type a question using a formal langage in order to find information based on your data set. This will return a graph with eventually a table, together with smart suggestions.

Figure 4: Q&A feature
From July 15th 2015, visualizations, Filter, and Field panes have been added to the Q&A. If I want to change the visual from line to bar chart, I just click on the bar chart icon.  Want to add a field to the visual, just click on the field or drag the field over to the appropriate location. 
Figure 5: vizualisations pane added to the Q&A

2- Schedule auto refresh: you can now schedule an odata auto refresh to keep your report up to date. See the article:
http://blogs.msdn.com/b/powerbi/archive/2015/06/22/announcing-refresh-support-for-power-bi-designer-files-in-the-power-bi-service.aspx


And just a last one for fun, where I used a "location" project custom field for a map chart in Power BI Designer to display the total projects costs by country with a slicer and a pie chart associated.
Figure 6: map chart with aa "location" project custom field, a slicer and a pie chart

Nice, isn't it?? That was just a simple example with a simple dataset and light formatting, but imagine what you could do spending a little more time on it!!

EDIT: sorry in advance for the video small size. I just tried a new capture tool and it seems like I can't get a bigger size..

Share this article :

Tuesday, June 23, 2015

How to deactivate a user with AD account deleted and no AD sync ?


Hi,

Here is a short one. One of our fellow MVP shared with us an issue which might look trivial. 

The background
Project Server 2013, on premise (meaning hosted on the customer infrastructures, not Project Online). The AD sync is not enabled, meaning that the users are created, updated, deactivated manually and not syncronized via the organization AD.

The issue
A user has been deleted from the AD. Since there is no AD sync in Project Server, the user in Project Server is not automatically deactivated. As soon as you don't need to edit anything in the user's profile, this is not an issue. But if you do, now there is an issue.. Project Server needs a valid AD account for every user, meaning that whenever you save a user's profile, it checks for the AD account and prevent you saving the user's profile in case the AD account is not valid (or empty).
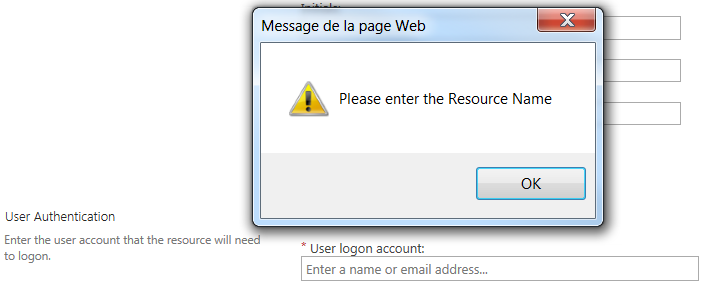
Consequently you just cannot edit anymore the user's profile to deactivate it, neither just delete his AD account, which cannot be empty for a user. If you try so, you'll get the following message:


Figure 1: error message while saving a user's profile with no valid account
Neither you can use the account status (active/inactive) since you'll be prevented from saving the profile.

The workaround
Discussing about this non-sense, another fellow MVP proposes a workaround: entering a valid AD account for this user deleted in the AD, deactivate him and save the resource. This is quite an ugly solution but it does the job, doesn't it?

The solution
Finally a third MVP brough up a solution, THE solution. In the user's profiles list (server settings, manager users), you actually have a button which is intented to deactivating users. We hardly make a stop on this button since it is there since ages and in our mind, what is old is useless and has obviously been replaced by a newer feature. This feature doesn't require to edit and save the resource but directly write in the DB whitout checking for a valid account, which solves our issue!
Figure 2: deactivating a user from the user's profiles list
The limitation
Nothing is perfect... Once deactivated as explained, you cannot use the same method ot reactivate the resource, you do need to edit the user's profile, facing the same issue again. But what would be the need to reactivate a user (not a resource) with no valid AD account?


The conclusions
  1. Do not bypass those good old buttons you are seeing since Project 2003 and never looking anymore. They can be quite useful. For example, the "view effective rights" feature can use very useful for supporting your users in case you have a complex security model. See this blog I wrote some months ago.
  2. An AD account should not be deleted but only deactivated, otherwise it could trigger such issues in connected systems.
  3. Anyway, using the AD sync prevents from having such issues.
  4. The MVP community is extremely powerful, skilled, reactive, imaginative, efficient!

Share this article :

Monday, June 8, 2015

Project Virtual Conference 2015

So excited, today was announced the Project Virtual Conference on 22nd October 2015. This conference is completely focused on MS Project, Project Server and Project Online, with a lot of support from the Microsoft Project Community. So attendees get pure, unadulterated content about using the technology for your business problems.

Please refer to site here:
http://projectvirtualconference.com 

Facebook page:
https://www.facebook.com/projectvirtualconference

Hastage: #ProjectVconf

Share this article :

Formatting the Gantt chart using the task status

Hi All!

Sometimes Project can bring up surprises. While trying to write a formula in Project Pro using the task status (late, on schedule, complete, future), it tooks me 15 minutes to find out that the status is actually a number and not a text. Here is a simple test. Take a project plan a create a number custom field (status number for example) with the formula =[Status]. 
Figure 1: using a formula for retrieving the status value
Here is what you get using a simple project plan:
Figure 2: task status value stored as a number
So what we can say is that the status is actually stored as a number in the Project DB, not as a text. Based on the value, the status indicator column proposes a corresponding icon. Here is a correspondance table:
Figure 3: status correspondance table
Thus if you do need to use this status to perform some calculation, keep this table in mind. Then if I go through the process quickly, here is how to proceed to format the Gantt chart based on this status.

Step 1: create your custom flag. Using the custom flag 1, 2 and 3, you can create a formula like 
iif( [status]=n ,YES ,NO), n being 0, 1 or 2 for complete, on schedule and late.
Figure 4: flag custom fields with fomula based on the status
If I group the table, it will be more readable:
Figure 5: table grouped by status
Note that I didn't configure any roll-up for the flag custom fields, but actually I should have set it as calculated with the formula, so it will be also applied at summary task level. Let's consider that it is configured like this for the next steps.
Figure 6: configuration for summary rows
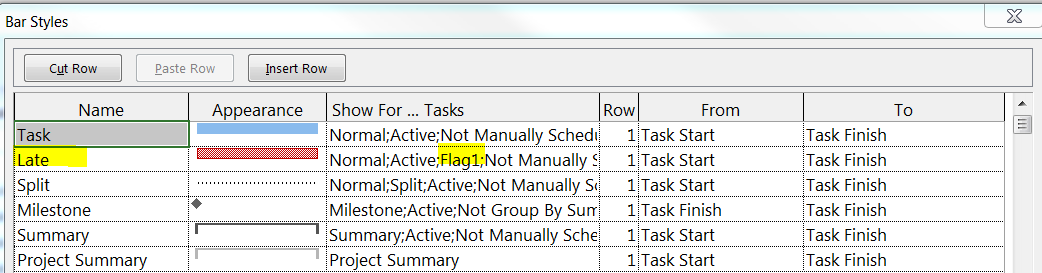
Step 2: create your bar styles. Insert a new row after having double-clicked in the Gantt chart. Note that you have to insert it under the normal task. Copy paste the task criteria bar style, copy it next to the new late task bar style and add the flag1.
Figure 7: bar style formatting for flag1 (late tasks)
Proceed similarly for the flags 2 and 3.
Figure 6: bar style formatting for all status
Here is what does it look like in the Gantt chart.
Figure 8: Gantt chart formatted along the task status
Et voilà!!

Share this article :

Monday, May 18, 2015

How to bulk change projects' EPT?

Good morning Community!

Nowadays, it is quite challenging to find new interesting subjects for blogging. We are a small but active Project Server community and the quality of blog posts and articles is really impressive. By the way I'm looking forward to share and read articles to and from the community about the next Project Server version.

One subject I did not find much references about is bulk changing projects' EPT (Enterprise Project Type). Moreover I've been asked this procedure many times on the Technet Forums, consequently I'll write down in this blog this procedure so I can share it more easlily. The procedures below are applicable for Project Server 2010, 2013 and Project Online.

As a preamble, I'll share here an excellent blog post about what is an EPT and how it can be configured written by a fellow new MVP, Jérémy Cottino. Note that EPT is quite a key feature helping structuring Project Server data and governance since Project Server 2010.

So where does the need come from? Typically, the project EPT drives the project governance. It will trigger which PDPs (including custom fields, reports, eventually custom code for business rules) will be associated to the project. Note that an EPT can be easily updated. For example, if you need to add a project custom field to an EPT, there is absolutely no need to create a new EPT adding the custom field and associate all projects from the old EPT to the new one. You can simply add the custom field to the webpart in the PDP and it will be added to all projects associated with the given EPT. Changing a project's EPT is more related to a governance change. In my point of view, a typical use case can be when a project has a scope increase and must go from a EPT with simple rules, few custom fields in few PDP to a more complex EPT providing a wider governance with a larger number of PDPs, custom fields, reports, business rules supported by jquery code...

We'll go through 2 methods.

Project Center: change EPT for a single project
First I'll start by explaining the default method to change a project's EPT from the project center. This method is applicable to a single project and cannot be used for bulk changing EPT. Note also that this method does not allow the administrator updating the project's stages if it is associated with a workflow. First navigate to the Project Center and select a project. The trick here is not to click on the project name but on another column of the project's row, otherwise it will open the project details.
Figure 1: opening the interface for changing a project's EPT from the project center
Once the project selected, you can click on the "change" button in the "Project Type" group of the ribbon. The functionnality requires having the "change workflow" global permission. This will open a simple dialog box showing you the current project type and proposing a drop-down menu with the available project types.
Figure 2: changing the project type
If the project is currently checked out, the operation cannot be performed until the project is checked in and the new project type drop-down menu will be greyed out.
Figure 3: dialog box for a checked out project
This operation will associate the project with a new project type. It is important to understand that it will not create, update, delete any custom field values. Meaning that if the source EPT contains custom fields not in the destination EPT, the values will still remain but the field will not be displayed nor used in any PDP. On the contrary, if the destination EPT contains custom fields not in the source EPT, they will be displayed in the new PDP with no value. 

Server settings: bulk changing EPT for a set of projects
The other way to change EPT is through the server settings. This method is quite interesting since it allows the administrator to perform this operation for a set of projects. The procedure starts by navigating to the "change or restart workflows" menu.
Figure 4: bulk change project type from the server settings
This menu will open a new page where you'll be able to select the source EPT, the projects belonging to this EPT and the destination EPT. Note that if you need to update projects having different types, you'll need to perform the operation several times, one per project types. Since this interface is designed in order to manage the project workflow phases/stages, those information are also integrated in the available project information. Here is the detailed procedure:
  1. select the source project type: this will automatically update the project list with the corresponding projects,
  2. select the projects to be updated,
  3. copy them using the arrow in the target list,
  4. select the destination project type. Eventually you can use this functionnality to restart the projects' workflow.

Figure 5: bulk change project type
Note that finally you can choose (if applicable) in which stage the selected projects will jump in.
Figure 6: skip to a specific workflow stage
Now that the procedure is crystal clear (at least I hope...), let's review some important considerations regarding changing the project type. You are aware that the EPT is like an container for the following items and it is important to understand what consequences updating the project type will have on those items.
  • PDP: changing the EPT will associate the corresponding PDP to the project,
  • Workflow: as we just saw, changing the EPT will also allow you (assuming you do it through the server settings and not the project center) updating the project into a given workflow stage,
  • Project template: a project template is associated to an EPT. Since it is just relevant for the project creation, it seems logical that changing the EPT after the project creation will have to impact on the existing project schedule, meaning that the new EPT's project template will not be applied. I would say "hopefully", since it would be a mess (or even impossible) to merge an existing project with actual data with a new project template.
  • Site template: similarly, a project site template is associated with the EPT. Changing the EPT will not have any consequence on the project site. This is the same principle than for the project template. The site template is only used at the site creation thus changing the template on an existing project will not have any consequence. If you do need to create a new project site based on a new template, you can create separately the new site from the appropriate template, migrate the content (this would be a manual operation) and associate the new site to the project using the "Connected SharePoint Sites" menu.
Hope you enjoy it!!

Share this article :