Monday, May 19, 2014

New task path in MS Project Professional 2013

MS Project 2013 has brought a nice bunch of new formatting features. Something that needs at least 10 clicks or writing formulas now takes only a click.
Figure 1: task path menu in the "format" tab of the ribbon
Among the new formatting features of 2013 version (critical path, slack, late tasks), we’ll go in this article through the task path formatting options. Those new formatting options allow the user displaying in one click the predecessors and successors of a given task. Meaning that it is now pretty straight forward to anticipate impacts on tasks.

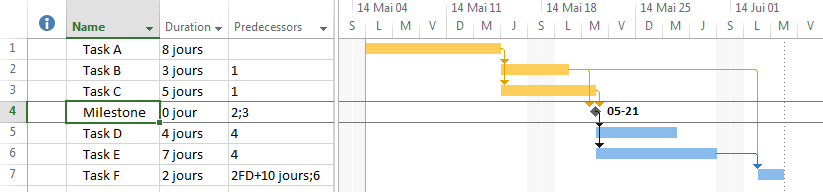
Let’s take an example creating a simple project plan with a milestone that you need to look at more in detail.
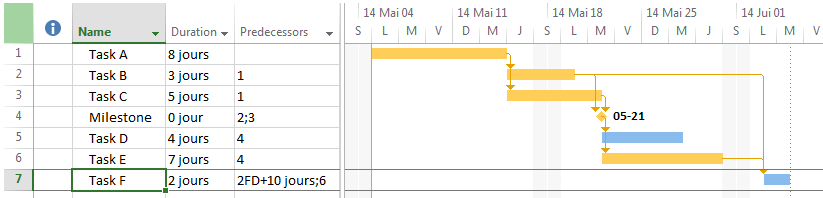
Figure 2: sample project plan
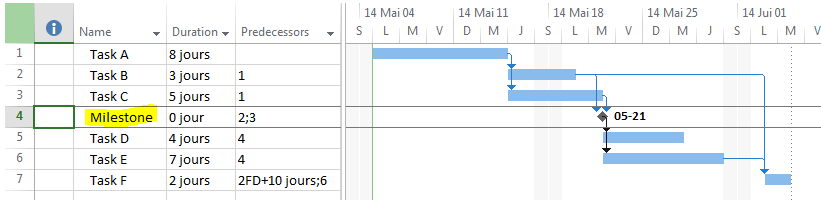
  • Predecessors : the predecessors of the selected task will be highlighted. In our example, the milestone has tasks A, B and C as predecessors. Note that it is not only direct predecessors, but also predecessors of predecessors.
Figure 3: milestone's predecessors
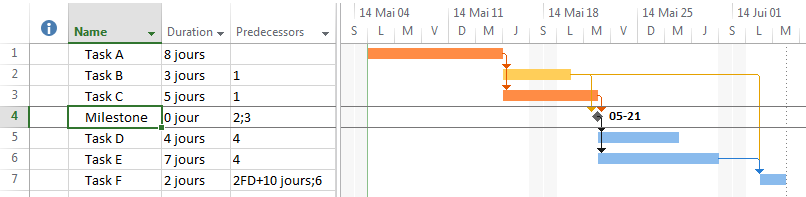
  • Driving predecessors : task B has not a direct impact on the milestone thus it is not highlighted as a driving predecessors. Indeed it has a shorter duration that anothers direct predecessors (task A and C). In other words, task B's slack for the milestone is greater than 0 thus it is not a driving predecessor. Note that you can multi-select formatting options, adding driving predecessors to predecessors formatting.
Figure 4: milestone's driving predecessors
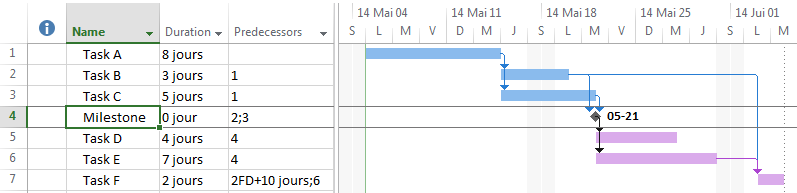
  • Successors : tasks D, E and F are successors of the selected milesone.
Figure 5: milestone's successors
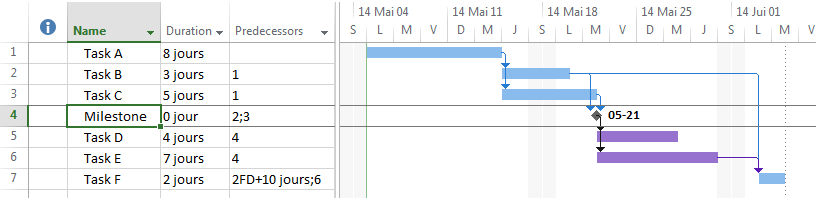
  • Driving successors : task F is not directly impacted by the milestone since its direct successors are tasks D and E, thus it is not highlighted.
Figure 6: milestone's driving successors
Note that this is a dynamic feature, meaning that keeping for example the « predecessors » option selected and selecting another task (task F for example), the formatting will be updated (compared to figure 3) when clicking, highlighting the newly selected task’s predecessors :
Figure 7: dymanic update of the task path on task change
As a nice improvment versus MS Project 2010, we’ll mention that the selected task is also under and upper lined in the Gantt chart.
Figure 8: task selected in MS Project Pro 2010
Figure 9: task selected in MS Project Pro 2013 under/upper lined in the Gantt chart

Hope you'll like playing with those new formatting features that give a brand new user experience to our project managers.
Share this article :

Monday, May 12, 2014

Multilines administrative time categories in PS2013 timesheet

Most of the timesheet improvments brought by Project Server 2013 are for the end users. But anyway what's a good for the end user is obviously good for the administrators, isn't it? Since we do like those "win-win" new features, we will go in this new post through the multiline administrative time categories. Note that in PS2013, the administrative time has been renamed "non-project activities".

A common need from our customers is the ability to manage in their timesheets tasks that are not personal tasks, neither on a specific project. That's why the administrative time was introduced since 2010 version. As it is a pretty straight forward and simple feature, you might ask "what could be new with the administrative time feature?".

So let me ask how do you manage support activities with tickets? The best solution is obviously an integration with Team Foundation Server, but you might not have it in your organization or you might not have to budget for the PS/TFS integration. Thus the common way to manage tickets in previous version was to manage a specific support project, which was tedious due to the project's granularity.

The new multiline feature expands the administrative time categories to take into account this type of work allowing multiline to be added to an administrative category in a given timesheet. Below is the procedure to implement multilines administrative time.

The first step is to define your new administrative categorie (non-project activity) in the server settings, checking the "Allow Multipe Lines" checkbox. In this case, it is adviced to flag the ticket activity as "approval required". Note also that the administrative time categories can now be department specific.
Figure 1: new multiline administrative time category creation

Then when the user goes to his current timesheet, he'll be able to insert one or more tickets activities not related to any project, giving a custom name.
Figure 2: current user timesheet
Figure 3: inserting a noin-project activity in the current timesheet
Picking up the "ticket" category, the user will be able to enter a specific name for the ticket activity.
Figure 4: entering a custom name for the "ticket" activity
 After entering as many tickets as required, the timesheet will look like this:
Figure 5: timesheet with 3 "ticket" activities
Grouping by billing category will give to the user a clearer view of the ticket activities in the timehseet versus the other administrative lines and the standard (project) lines:
Figure 6: timesheet grouped by billing categories
As another nice improvment, we can mention that the non-project lines are now carried forward to timesheets for future periods, supporting in the best way possible this new multiline administrative time categories.

Hope you'll try and enjoy it. I'll be pleased to hear from you other use cases than the ticket use case presented here in this post.
Share this article :

Friday, May 9, 2014

Do not open Projects in Edit Mode unexpectedly in Project Server 2013


If you are used to open projects in Project Professional in 2010 by double clicking on a project in the open window, you should know that the project is by default opened in edit mode and though checked-out.
Project Server 2013 is bringing here a nice improvement that I, as administrator, am really happy to welcome.
All Projects in Project Professional are by default opened in read-only mode and can be opened in edit whenever you want.


Then, while opened in Read Only , as for Office in 2010 and 2013, Microsoft introduced the "Notification bar" in Project 2013 allowing you to check-out the file.


I already hear you saying: "What about my modifications made while in read-only?". Don't worry, Project is clever enough to just check-out the project without reloading it. Any modification made in read-only mode are kept while checking out the project file


What if a co-worker changed the project in the meantime? Project will ask you to save you changes.


if you choose yes, it will ask you to find a place to save it before checking-out the file


You will have to pay attention while using the "Recent Projects" opening, by default, it will check-out the file for you!


From PWA the options are still the same : while clicking on the little workplan icon, the project will open in Edit mode to your computer MS Project and clicking the project link will open in Read only in PWA.

If you want to open in another manner, you'll have to select the line (not clicking the project link but next to it, this, I guess you're familiar) and select the proper open option from the rubban

You will never again lock a file without noticing it!
Share this article :

Thursday, May 1, 2014

Project Lite now available!!

Microsoft released today, May 1st, the new Project Lite! This is quite exciting since the licence price for team members goes down from $33 to $7. Even with limited features, it will make the Project Server accessible for small businesses.

"We’re pleased to introduce Project Lite, a new cloud offering that will become available on May 1, 2014. Project Lite is designed specifically for project team members, with features to view/update Tasks, enter Issues/Risks and Timesheets. At just $7 per user/month, instead of the original $33 per user/month with an annual subscription, Project Lite will bring powerful cloud service to even more people and significantly lower Total Cost of Ownership for our customers."


Here are the features available with Project Lite:
  1. Tasks :
    • Create new task/assignment
    • Reassign task
    • Self-assign team tasks
    • View/edit task center
  2. Timesheets :
    • View timesheet
    • Enter hours
    • Add/remove task from timesheet
    • Turn in timesheet
  3. Collaboration :
    • View/update status, issues, risks
    • View/update project documents
    • View project center, schedule, details, summary
    • View approvals
    • View resource assignments
    • Create/modify/delete links between tasks and items in project site

Read more on Microsoft blog here and here!!

Share this article :

Timeline in Project Web Access 2013 : new nice feature!!

The timeline in MS Project Pro 2010 has been a really great new feature which was strongly appreciated by project managers when they need to quickly extract a graphical overview of their project plans for executive committees presentations.

But what about a portfolio timeline view including multiple projects? That was not possible with Project Server 2010. Hopefully Project Server 2013 brought a bunch of nice new features such as the timeline in PWA, meaning in the proejct center and in the project schedule page.

So in this post, not much writing but just a quick description of this new feature quite easy to use and with a extremely nice render!

Below is the project center (still in french, I promise I'll get an english PWA as soon as possible...), where you can select a project in the grid and click on "add a project" in the "project" tab on the ribbon, under the "timeline" section. Be aware that if you click on the project name hyperlink, you'll go directly to the project details, so just click on another cell next to the project name.

Figure 1 : Project center timeline with the "add to timeline" button

When you click on the timeline itself, a new contextual "timeline" tab appears in the ribbon. It allows you formatting the bars with custom fonts or colors. You can also choose to hide or display some items like dates or lock the timeline width. Finally selecting a specific bar in the timeline, you can remove it or display it as a legend.

Figure 2 : "Timeline" tab with formatting options in the project center ribbon

Going to the project detail in the schedule page, you'll be able (assuming you're in edit mode) to select a task and add it from the "add to timeline" button.

Figure 3 : Project detail timeline with the "add to timeline" button

Note that selecting high level phases of your project will give you a really nice result. Similarly to the project center, you can click on the timeline to display the "timeline" tab of the ribbon in order to do some "sexy" formatting.

Figure 4 : Timeline" tab with formatting options in the project detail ribbon

Note : (read carefully the edit at the end of the post, the first part of the sentence below is erroneous but I keep it as is to keep track of the post history)
As an important comment I'd mention that whereas the project center timeline is user specific (stored in the personal settings), the project details timeline is project specific, meaning that modifying it requires checking out the project in PWA or MS Project Pro. The project details timeline can then be seen from 3 different places :
  1. PWA, editable when checking out the schedule (figure 3 and 4),
  2. MS Projec Pro, editable when checking out the project (figure 5),
  3. The project site welcome page, consultable only (figure 6).
Figure 5: project  details timeline in MS Project Pro

Figure 6: project  details timeline in in the project SharePoint site


Hope you enjoy this nice new feature that brings to the PWA 2013 a brand new view at portfolio and project level. Try it and you'll love it!

EDIT June 10th 2015: Damien brings a useful contribution in his comment below by mentionning that the Project Center timeline is NOT user specific since it is stored in a Sharepoint list.

Share this article :